by Josh Shirt, Professional Mastering Engineer, Mix Engineer & Creative Producer
Last updated: July 10th 2025
Whichever software you are using, we can work with you and use our expert skills to mix and master your music, thanks to stems.
In this article we will cover the topics “what are stems?” and “how to create stems”.
Let’s start at the beginning. When you have created a song or piece of music on your computer it will usually be a set of channels (or tracks) layered on top of each other.
There will likely be a channel for guitar, drums, bass, vocal, and surely many other sounds, too.
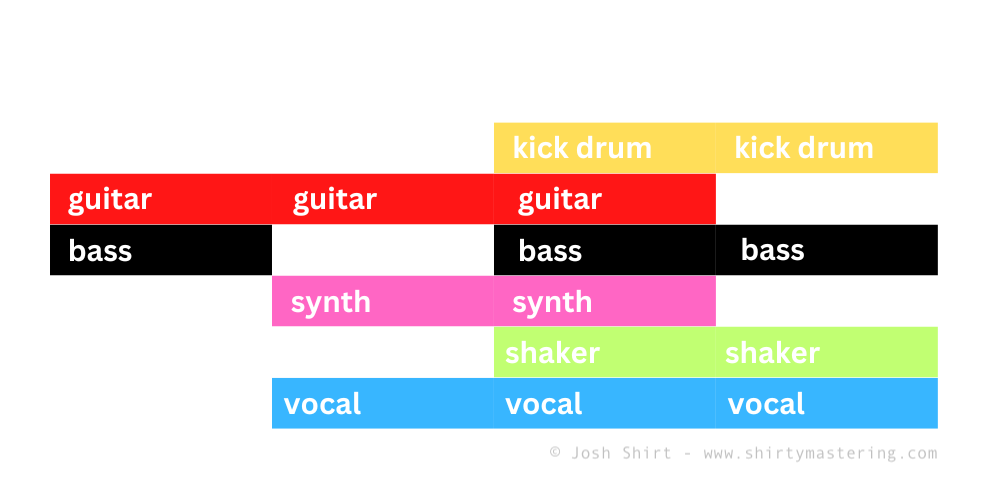
When you play the song back, the play cursor runs from left to right, playing all of these channels (i.e. instruments or parts) at the same time, to create the piece of music that you intended to make.

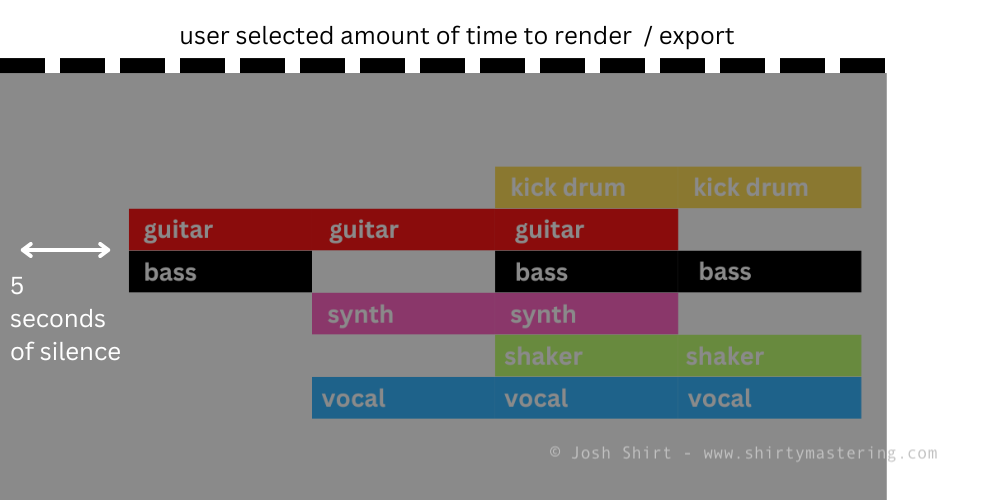
In order to play the song on your phone / Soundcloud / BandCamp, you need to “export” or “render” the audio into a single audio file (the term that is used depends on which DAW (digital audio workstation) you are using).
The amount of time that you tell your software to “export” / “render” (i.e. how much of the arrangement you highlight) affects how long the resulting file is, and therefore what’s included in the audio file.
For example, if you ask the arrangement to begin rendering 5 seconds before the first instrument in your song plays, then the exported file will contain this 5 seconds of silence, too.
Now, let’s talk about stems.
What Are Stems?
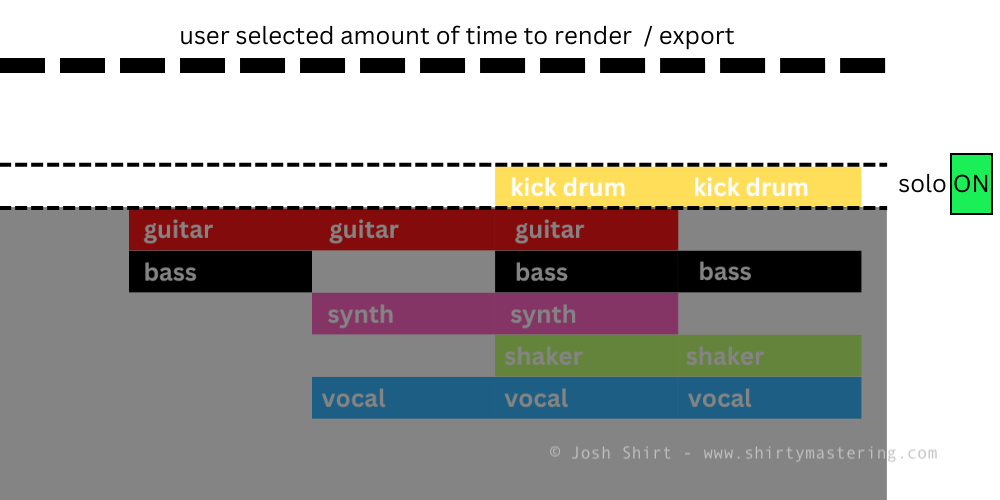
Stems are the individual tracks or channels that make up your song, ‘soloed’ and rendered into their own individual files.
SOLO is usually marked with a single ‘S’, and appears at the end of each channel in your DAW, along with other mixer settings.
Selecting SOLO isolates the sound / instrument in the soloed channel, so that it plays back on its own, with no other channels (aka tracks) audible.
How to Create Stems
Making The First Stem
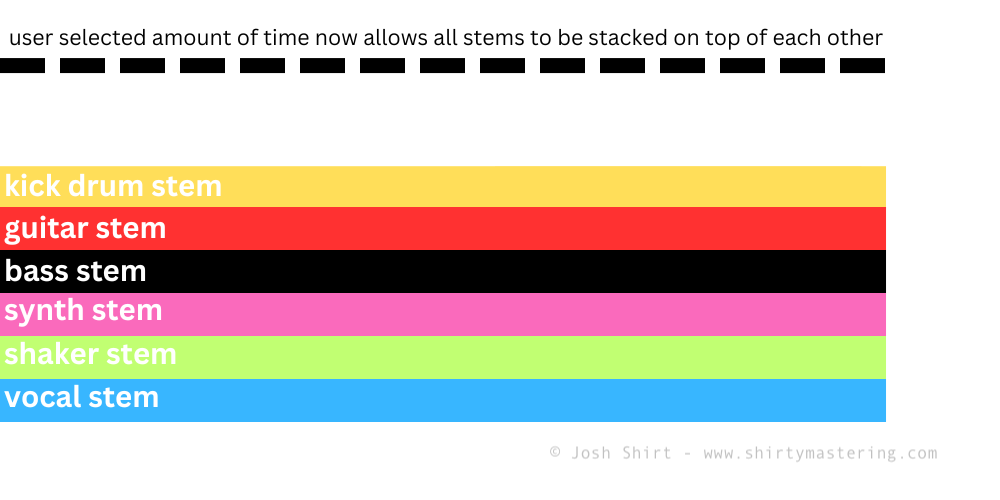
To make a stem, select an amount of time to render (shown by the dotted line and greyed area in the image above) and SOLO the first track / channel (in this case, the kick drum).
Select “export” / “render” and name your file with the name of the track you soloed (e.g. songname-bass.WAV or songname-bass-tracktempo.WAV).
Keep an eye on the master channel as you export the stem, to make sure that it doesn’t overload. This is known as clipping and it introduces pops and clicks into your music. Often this is shown by the master meter in your DAW turning red. If this happens, turn down the soloed track by -3dB and try exporting again. Repeat this process until the meter doesn’t turn red.
Once the file has been created, it will likely contain silence at the start, and in this case, with the kick drum, the sound will not be heard until closer to the end of the file. This is correct. When making stems, all of the stems need to be the same length (this is explained in more detail later) and so they often contain silence.
Sending us your song to mix and master? We are here to answer any questions you have about this process, just contact us here or call (+1) 970-372-2213.
The Best File Format And Audio Settings For Stems
When you select “render” / “export” you will be asked what type of file you want to create, and be given audio settings to select from.
First, decide if you need to export a “mono” or “stereo” stem. Select “mono” if the channel / track appears in your DAW as a single waveform, like this:

Alternatively, if your channel / track contains two waveforms (i.e. one for the left speaker and one for the right speaker), use “stereo”:

If you are exporting MIDI (and do not see a waveform similar to those above, but instead MIDI notes), always use “stereo”.
Next, export your audio as a WAV (wave) file, 32bit, 48kHz (aka 48000).
Make sure any option to “Normalize” the audio is turned OFF (If “Normalize” is turned on, it will make every stem as loud as possible, destroying your current “final mix” when then stems are reassembled.)
Making The Second Stem
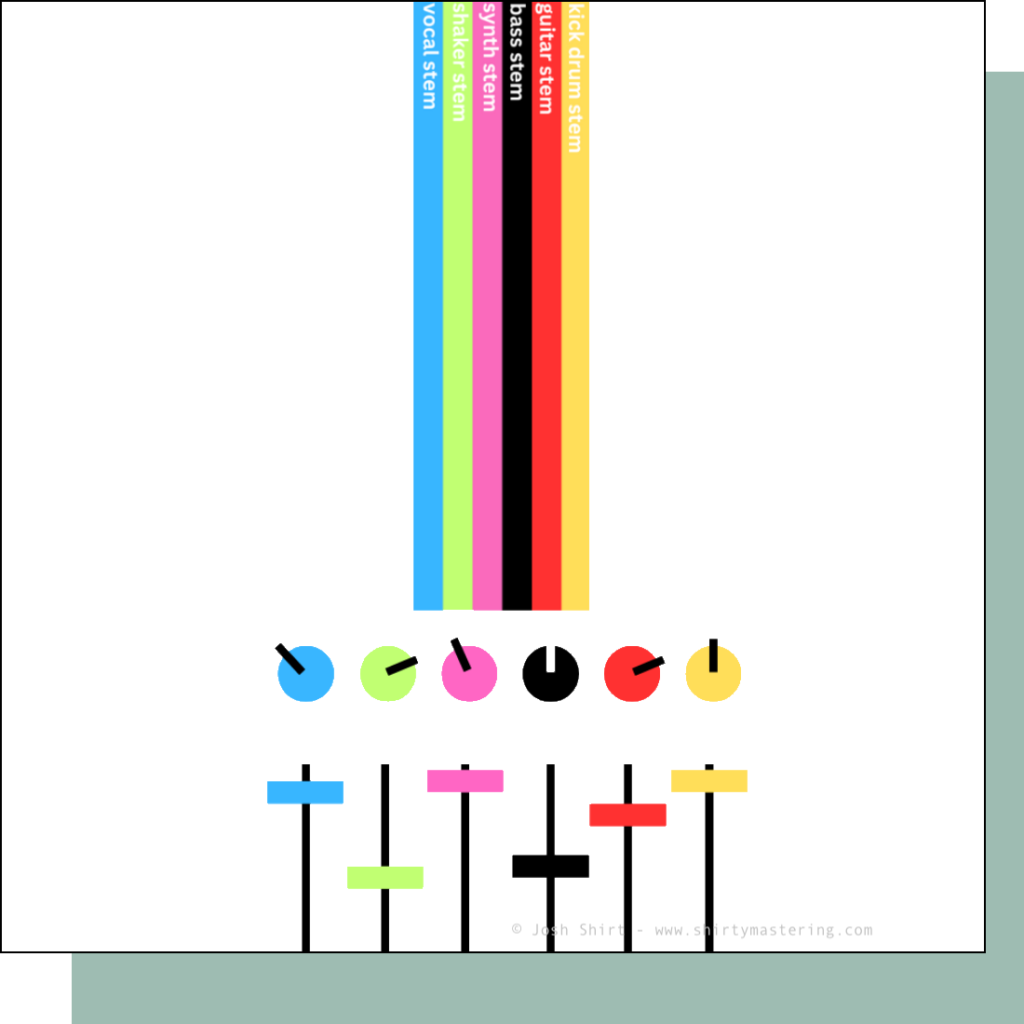
Next, and this is crucial, keeping the same amount of “time to render” selected (shown by the dotted line at the top of these illustrations), click solo on the next track (in this case, the guitar):
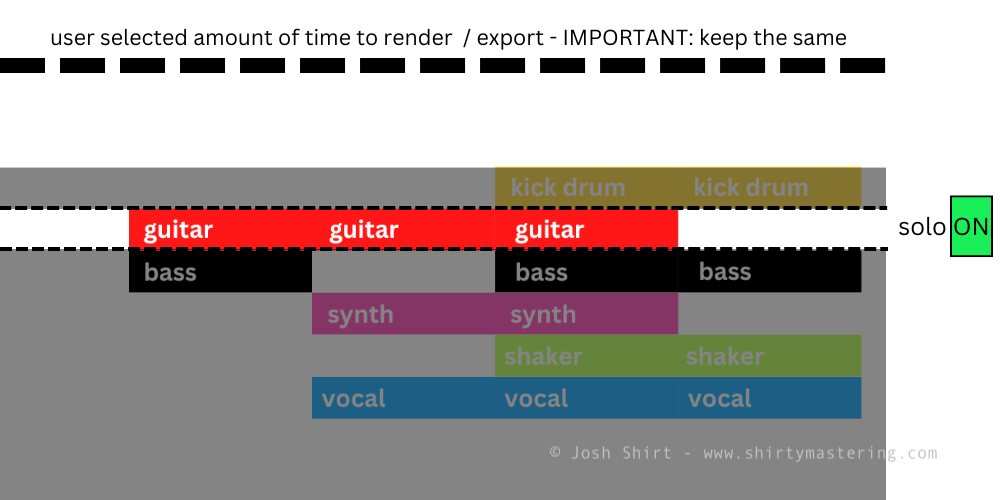
Press “render” / “export” and name the file accordingly (e.g. songname-guitar1.WAV or songname-guitar1-tracktempo.WAV).
Repeat
Repeat this for all of the tracks in your song.
Finally, solo any “send / return” tracks in your set (these tracks usually contain FX: reverb, delay etc.) and add those stems to the folder containing all of your stems.
Job done!
The Benefits of Making Stems of Your Song
Your song can be re-created exactly as you intended, yet everything is still up for grabs – individual instruments can be adjusted in level and a professional can use their expertise to add extra processing and FX, to enhance your sound.
Stems also allow people to easily remix your music later, for example if it is to be used in a TV show and a version of the song is required without the vocal, or if another musician or DJ asks to re-interpret your music.
When You Send Us Your Stems
When you work with us and ask for professional mixing and mastering, we load up your stems in our studio and export them into a single song (essentially a single WAV (wave) file).
We then send this file back to you and ask you to listen to it to confirm that nothing is missing from your song.
We then get to work mixing and enhancing your sound, returning to you a professionally finished song ready to release to the world. Our clients usually take finished tracks and send them off for CD duplication and/or they distribute them to the major streaming sites globally. We are knowledgable about this distribution process and we’re happy to share advice and guidance once your music is complete.
Let’s Work Together
We are here to help musicians achieve a better sound from their music, and we have a proven track record – our work has been featured on music blogs, on the radio and on TV and is well rated on Google.
You can see all of the services we offer here & answers to frequently asked questions are here.
Please contact us for more information, we look forward to hearing from you.
Josh Shirt – josh@shirtymastering.com